Facebook Ads: Interest Targeting for Beginners, A Step-by-Step Guide
- Catherine Stewart

- Jul 2, 2020
- 3 min read
Updated: Jul 6, 2020

Target Your Ideal Customers on Facebook Using Their Interests, Demographics and Behaviours - A Step-by-Step Guide to Getting Started
Take your finger off the 'boost post' button and head over to Ads Manager for better results from your Facebook advertising. To help you get the most out of Facebook ads I'm going to take you step-by-step through the basics of Facebook ad interest targeting for beginners. We'll go through how to set up an interest targeting campaign in your Facebook Business Manager and avoid some common pitfalls.
But first, let's be realistic here. Interest targeting will be a 'cold' audience who have had no (or very little) interaction with your business prior to seeing your Facebook ad. So the chances of conversion from this type of ad is relatively low (but not zero, you should get some conversions). So interest targeting should only be your starting point before you move on to custom audiences and re-targeting 'warm' audiences.
Step 1 - Facebook Ads Manager
You need Facebook Business Manager for this - this is the platform where you can access all of Facebook's powerful marketing tools, including Ads Manager.

Step 2 - Create a New Campaign & Choose Your Campaign Objective
The default setting here is 'Traffic' and this is a good option if you're just starting out, the Facebook algorithm will show your ad to people more likely to click through to your website. Once they've clicked through (and assuming you have the Facebook ad pixel on your website) you can re-target them as a 'custom audience' of website visitors.
Be aware that optimizing for conversions (purchases, adds to cart etc.) is going to be more time consuming and costly than getting click-throughs. So if you're on a relatively lower budget, better not start with this.

Step 3 - Edit Your Targeting in Ad Sets

Step 4 - Set Your Budget & Name Your Ad Set

Step 5 - Where Do You Want To Send Traffic?
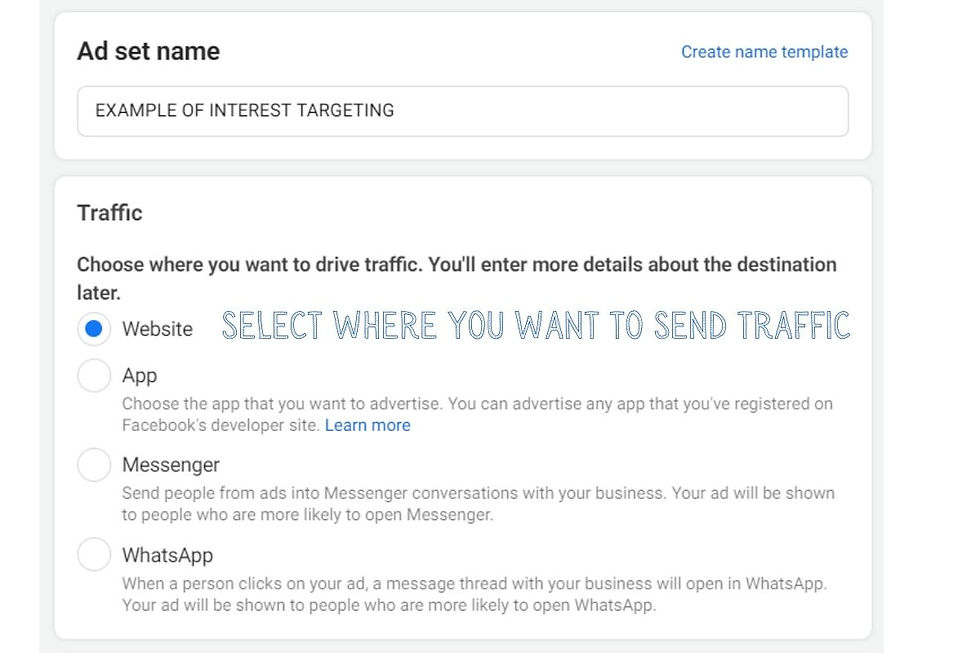
Step 6 - Set Your Budget

Step 7 - Choose Locations to Target

Step 8 - Age, Gender & Language Targeting
If you have a clear idea of the age and gender of your ideal customer, then edit this targeting. But if you're unsure just leave it open. Later, when you check your ad report you can breakdown the results by age and gender and see who is responding to the ad, and then choose to narrow down the targeting at that point.
If you're advertising in locations where multiple languages are spoken (like Hong Kong) pick the relevant language here.

Step 9 - Search Detailed Targeting for Relevant Interests
Now we start to search for interests, behaviours and demographics that target our ideal customer. The important thing to note here is that you're targeting any of these interests, not all of these interests. So for example, if you want to target ex-pats interested in fashion you might target people interested in Vogue Magazine and Expatriate Lifestyle - and you would reach some people just interested in Vogue Magazine and some just interested in Expatriate Lifestyle (and some overlap). You can narrow down targetting - I'll show you how to do that.

Step 10 - Check Facebook's Targeting Suggestions
Once you've selected an interest to target, click on the 'suggestions' tab to browse other related interests you could include. Continue to do this for every interest that you select.

Step 11 - Browse Relevant Interests
Next, we hit the browse tab and search for more relevant demographics, interests and behaviours.

Step 12 - Narrow Your Audience
Here you choose to narrow the audience so that ONLY people who match these criteria will see the ad. So, for example, you could choose to show your ad only to parents of a particular age group of kids. Be aware that narrowing your targeting could make your audience too small to be effective, so you must monitor that.

Step 13 - Target Engaged Shoppers?
If you're aiming to make an online sale, you can choose to narrow your target to 'engaged shoppers' here.

Step 14 - Exclude People From Your Target Group
If you know there are particular people who you don't want to see your ad, you can exclude them here.

Step 15 - Check Your Audience Size
A tiny audience, or a massive unfocused audience, will not be successful. Keep your audience size in the green area, if it's too large or too small then adjust your targeting accordingly.

Step 16 - Automatically Expand Targeting
You can choose to allow Facebook to automatically expand your targeting. I wouldn't recommend selecting this option if you're new to Facebook ads.

Step 17 - Monitor & Adjust
There is no 'set it and forget it' Facebook ad campaign, unfortunately! So you will need to check in with your ads (via the 'Ad Reporting' function) and keep adjusting to improve and maintain your results.
I hope you found this post useful! Let me know if you have any questions and subscribe to our email list for more digital marketing tips and ideas.


Comments